Wednesday, February 10, 2016

PREVENTING YARD WARS! BOUNDARY IDEAS!!!

PREVENTING YARD WARS! BOUNDARY IDEAS WHEN PHILOSOPHIES DIFFER

For the most part, neighbors plant & mow the same types of grass.                 They don't often care  where their yard stops and the other begins.
But what if you don't have the same ideas about gardening?
Here are some neighborhood yards and gardens that conjure up some         interesting solutions.
This gardener used black star gravel and a metal border. To prevent gravel          from becoming a problem for the neighbor's lawnmower, they then                  cleverly transitioned to a black mulch!
I'm not sure I like the stark all-gravel look with a bungalow, but never mind.
These two neighbors have a dramatically different philosophy!
To solve the problem and keep the gravel in its place, they've used landscape       bricks and a metal runner.
Note: The nut sedge has already decided to live in the gravel. (Mother Nature       hates a void.)
It pains me to admit that one of my neighbors in the next block has a fake             yard. You are looking at St. Augustine grass on the left and the fake yard                 on the right.  The concrete divider comes standard with the fake grass.                     By the way, studies have found that the fake grass heats up about the                    same as concrete sidewalks. I've not tested the theory, so let's move on.
The family on the left wanted to plant natives and do away with part of                   their lawn. Landscape bricks separate their planting from the St. Augustine lawn       next door.  I liked this idea so much that I borrowed it for my own border       problems (which I'll show you at the end of the post).
A small ditch separates these two different mowing philosophies;                         longer grass on the left and shorter grass on the right.
Both are St. Augustine grass.
Three of the newest homes have Bermuda grass lawns.
I personally do NOT like this type of grass since it is much more difficult to         maintain.  As you can see on the left, weeds are a constant battle. If you are         next to a standard St. Augustine lawn, you'll need to install a metal strip to       prevent the lawns from battling for supremacy. 
Another example. St. Augustine grass on the left and low cut Bermuda                grass on the right.
Nothing divides these two types of grasses and this could lead to problems.
Bermuda grass is on the left and something new is on the right. I'll check back           in a couple of months to see what happens.
If both houses have no lawn and lots of shade, homeowners like this one               plant under story shrubs in a shared bed (left side). The right side of the         property has a fence, then gravel next to the sidewalk. I like when neighbors             work together. It looks like one endless garden.
***
I hope you NEVER have to face a boundary problem between you and your     neighbor.
But if you do, hopefully this post will offer some solutions to keep the peace.


Tuesday, February 9, 2016


Snow, snow, go away!  It’s March, and yes, snow is a possibility, let’s hope not!  We’ll look at your lawn situation if it snowed much in February or if it snows in March.  We’ll also review lawn ideas for March if snow is not an issue.

Snow is good since it provides much needed moisture to your lawn and landscaping plantings during winter months.  Snow and cold weather also help the lawn go through its natural winter dormancy so it grows vigorously each spring.  However, I’m sure we all hope there is no snow when you read this article, we want spring to arrive!  How many times did you have to apply ice melters this winter?  Was it 5, 10, 20 times?  Did any of the ice melt drift off into lawn areas, I’m sure some did?  Depending on the type of ice melt you use you may have different degrees of lawn damage.  Rock salt and grass do not particularly like each other.  Salts draw moisture out of plants sometimes causing death.  Magnesium Chloride and Potassium Chloride are also common ice melt materials.  The good news is they are also components used in lawn fertilizers.  Hopefully these did not cause as much or any lawn damage.  Magnesium and Potassium can cause damage if you had to apply excessive amounts of these materials.

Snow and salt damage on lawns can be neutralized with applications of Gypsum or Calcium Sulfate Dihydrate which is found in our Love Your Lawn – Love Your Soil product. Aeration or loosening up the soil with a rake prior to applications of these products helps get to the root of the problem.  In the absence of enough moisture, heavy watering cans also help to “wash-out” some of the residual salts in the soil.  Salt damaged lawns will have to be re-seeded to avoid weeds invading these areas.  Snow mold may also be a problem on the lawn if there has been heavy snow cover for many weeks.  Snow mold may present itself once all snow has gone away.  If the lawn has died you should re-seed these damaged areas.

If it did not snow much in February or March do not read the first part of this article!  Let’s get your lawn going now.  Rake up lawn areas to get rid of any leaves and debris.  Determine where you need to re-seed bare spots and pick the correct grass seed mixture for the area whether it is sunny or shady or heavy traffic.  Apply a new seeding-type starter fertilizer and any other soil supplements you may need.  How good is the quality of your soil? Perhaps you need some calcium to raise the soil pH, did you test your soil for its pH value?  We have suggested this many times in prior articles.  If you have too many weeds growing in your lawn over the years your pH value is probably low.  If you are not seeding, apply a traditional lawn fertilizer in early spring to wake up your dormant lawn.

What about soil compaction, drainage problems or shade?  These problems should have been addressed last fall when the air and soil temperatures where more pleasing to work in your yard.  You cannot grow a great lawn without the proper environment, one that favors grass growth and not one with various problems like we have discussed.

If you are not seeding I would hold off on applying crabgrass preventers until April.  Let the newly seeded grass grow and be mowed a few times.  By delaying crabgrass control you will see less crabgrass this summer.  Remember, crabgrass only really grows in sunny areas of your lawn.  Let’s get going and grow the best lawn we can this year, I know you can do it!

Thursday, January 28, 2016

How to fix Multicolored Lawn

Is your lawn Is your lawn a variety of colors right now?  Chances are it's because your lawn is made up of a patchwork of grasses. 
It is important to know as much as you can about the different types of grasses in your Lawn It is important to know as much as you can about the different types of grasses in your lawn and how they behave so that you know what to expect from them.  If the patchy lawn bothers you, you can choose the correct solution. 
I've seen a lot of people assume that their dormant Rough Bluegrass is an "insect" problem.  They go out an needlessly apply a potentially dangerous insecticide for no reason that doesn't solve their problem.  Knowing the types of grass I've seen a lot of people assume that their dormant Rough Bluegrass is an "insect" problem.  They go out an needlessly apply a potentially dangerous insecticide for no reason that doesn't solve their problem.  Knowing the types of grass in your lawn really helps you formulate a plan for your lawn.  

ROUGH BLUEGRASS

Rough Bluegrass is a weedy grass type that thrives in wet, shady lawn areas.  It has stolons which is a fancy name for an above ground root that allows it to climb over other grasses.  That's why you'll see it start in a small patch and get gradually bigger.  In the spring, Rough Bluegrass stands out from traditional grasses like Kentucky Bluegrass and Turf Type Tall Fescue because it is lighter in color and typically grows faster and sticks up taller in the spring.  The problem with Rough Bluegrass is that when the weather warms up, it goes dormant really early.  When it's dormant, it looks dead.  You'll see matted down patches of grass that seem to have no life left in them.  I've seen people incorrectly assume that they have an insect problem and go out to apply a chemical insecticide to correct the problem.  If you know the grass type, you won't be tempted to use the wrong product to solve the wrong problem.
Here's what Rough Bluegrass looks like in the spring in a Tall Fescue Lawn:
Rough Bluegrass
Here's what Rough Bluegrass looks like next to Turf Type Tall Fescue in the middle of the summer:
It would be pretty easy to assume that the Rough Bluegrass pictured on the left is dead right?  If you have a patch of that in your lawn, you'd imagine that it was insects or disease or something.  It turns out, that's just what Rough Bluegrass does in the summer.  It will recover on its own when temperatures cool in the fall. 
I would NEVER buy any grass seed that contains Rough Bluegrass unless your lawn is really wet and shady.  Many "Shade Seed" mixes will contain Poa Trivialis (Rough Bluegrass) and I would avoid those. Rough Bluegrass can also end up mixed in with grass seed that you buy if you're purchasing Kentucky Bluegrass mixes.  This is because Rough Bluegrass has a seed that is very similar in size and weight to Kentucky Bluegrass which makes it difficult to sort it out of Kentucky Bluegrass mixes.  That's another reason we recommend a primarily Turf Type Tall Fescue seed mix .  If your lawn is full of Rough Bluegrass, you can either learn to live with it turning brown every summer (much earlier than other grasses) or you can decide to replace it.  If you decide to replace it, you'll want to "renovate" your lawn.  The best time to Renovate Your Lawn is in the late summer (August/September). 

CREEPING BENTGRASS

Creeping Bentgrass is similar to Rough Bluegrass (Poa Trivialis) in that it crawls over more desireable grasses in your lawn via above groung roots, called stolons.  These stolons are the reason that when you try to rake your lawn it pulls up like a bad comb-over job.  Creeping Bentgrass is a finicky grass that when grown under ideal conditions can produce a beautiful lawn.  It tolerates short mowing and is used extensively on golf course greens.  The problem with creeping bentgrass is that it is susceptible to a variety of diseases and insects and generally struggles during the summer.  When creeping bentgrass turns brown and goes dormant during the summer, it tends to be invaded by annual weeds.  The bentgrass in the picture below is shorter than the other grasses and has a blueish tint.
Bent Grass

OLD FASHIONED TALL FESCUE

Always mistaken for "crabgrass" old fashioned Tall Fescue is a perennial grass that has very coarse leaves and sticks out like a sore thumb in a fine textured lawn - especially when all the fine textured grasses turn brown in the heat of summer and Tall Fescue stays nice and green.  If you have a lot of clumps of this grass, I'd recommend over seeding the rest of your lawn with Turf Type Tall Fescue, like our LandXscapes Tuff Turf, which will stay greener during the summer and camouflage the old fashioned Tall Fescue.  If you really want to eliminate it, there are a few chemicals that will do the trick, including roundup.

WHAT TO DO ABOUT YOUR PATCHWORK LAWN?

If you can tolerate an imperfect lawn and don't mind the lack of uniformity, it often makes sense just to do the best you can and understand that your lawn will never be perfect with the grass varieties it has.  In fact, if you have rough bluegrass or even creeping bent, your lawn will often times look terrible during the summer.  There is not much you can do about that other than eliminate your grasses and start over with a new lawn.  We call that a lawn renovation. 

Monday, January 25, 2016

How to Make Sure Next Year's Bulbs Look Great

How to Make Sure Next Year's Bulbs Look Great

Lawn Care vs. Bulb Care
KEEPING YOUR LAWN LOOKING BEAUTIFUL AND HEALTHY AT THE SAME TIME

I was speaking with a neighbor the other day. She was telling me about how her lawn was 
not as healthy as it could be. She told me that the flowers in her front garden bed were not
 producing anymore flowers; and yet, her back flowers were doing okay in this situation. 
She honestly did not know what to do about it. 

She was shaking her head in puzzlement. The same day another neighbor came up to me 
with a different issue. 

She told me that her front flowers in the bed were looking a bit sickly. These flowers had turned yellow. They looked God-awful. She did not know what to do either. She told me she was doing everything she could; and yet, the problem was happening. 

I asked them both about the lawn care company they used. Both admitted that they didn't really 
pay that close attention to what was going on. I told my neighbors that the company probably 
used some sort of fertilizer, a fertilizer that was affecting the lawn and soil. 

This very same day, a third neighbor came up to me and inquired about how to get better lawn care. 
I decided that instead of speaking to each one separately, I was going to do this as a three-in-one shot.

I gathered the three of them around. I then imparted some advice onto the three of them. This very same advice I am giving to you too, my dear friend. 

LOOKING TO THE FALL

This might seem a bit strange; but, you need to start planning ahead for your lawn. In the summer time, look to what you are going to plant in the fall. Write it down. This way you will know exactly what you wish to get at to get.

It's best to do this during the hot months of the summer. Stay in doors and write it all down. There are going to be times of thunderstorms. Write down your plans then too. You are going to have rainy days in the fall. You might even have hot days in the fall. If you live down here in the south, like we do, this is an every day occurrence. Plan for these things. Look at what kind of bulbs you want. Look at what types of bulbs can take the heat and/or rain.

COMMUNICATION

This is one of the bigger ones. Always communicate your wants/needs to the company who takes care of your lawn and bulbs. They might know you, but they do not "know" you. Always tell them specifically what you are after. The biggest mistake my one neighbor made was leaving and not saying anything. She told me she trusted him. That trust didn't take her very far. Do not make the same mistake. 

It's possible to have a healthy, green lawn. It's also possible to have healthy, flourishing bulbs. You can also have both; but, you have to keep an open dialogue. 

DISCOUNTS ARE GOOD

If you are anything like my three neighbors, you love discounts. There are lots of lawn companies who offer a five percent discount for buying early. If you buy your bulbs by July the first, you get the savings. If you buy it all on time, you get an extra five percent discount. This is a total savings of ten percent. 

OTHER THINGS TO KEEP IN MIND WITH YOUR BULB PLANTING

Alliums and Ornamental Onions are some of the best bulbs to plant in the fall. There are some Alliums that grow to the size of a volleyball. I am not kidding.
With these two bulbs, you will get your choice of color, flower size and height. It's truly remarkable how big and bright come of these bulbs get.

I hope this helps you out. My neighbors got better results after they saw this. Please let me know how things go. Share your story with me. I am always interested in how other members of the community are doing with their lawns and bulbs. 

Friday, January 22, 2016

How do you buy good quality grass seed?


How do you buy good quality grass seed?

How do you buy good quality grass seed? The basis of a great lawn is to use good quality grass seed such as our Black Beauty Ultra.  Look for seed from reliable sources or ask a neighbor with a great lawn what they used.  Grass seed is a product of nature so look on the analysis label on the bag for low percentages of weed seed, less than 0.10%; other crop seed, less than 0.25% and inert matter under 2.00%.  Introducing more weeds or difficult to control crop seeds makes your lawn care plan tougher to get ahead.  In the mid-Atlantic and northeastern states, it seems that Tall Fescue based mixtures have become the grass seed of choice over the last 30 years.  The greatest improvements have been thinner grass blades than older “meadow-type” fescues and darker green color.   Choose the best time of year to re-seed either early spring or early fall.  I took a call from a homeowner around November 15th and they asked if this is a good time of the year to seed?  They said they heard that “the fall” is a good time to seed?  Yes, it is but why not seed in early fall not late fall so you get the maximum growth potential before cold weather sets in?

Why is soil pH so important?  All plants like to grow within a certain range of soil pH to thrive.  If your lawn soil is too low or too high grass plants will struggle to survive.  Soil pH levels of 6.2 to 7.0 are best.  If you do not know your soil pH, buy a tester from your local lawn & garden center or hardware store.  Use Mag-I-Cal to raise soil pH and sulfur based products to lower soil pH to a desirable growing level.

Lawn grasses like and need to be fed during the growing season from early spring through late fall.  If you start with quality grass seed and your soil is balanced, feeding the grass and watching it grow is the fun part. You may be able to do away with any crabgrass controls if your lawn has been growing thick and green for a few years.  I would suggest 3 to 4 feedings a year, one in early spring and then again in early June, early fall and then late fall.  If you have been only feeding your lawn 1 to 2 times a year you need to increase that to 3 or 4 times a year to develop a good lawn.  You might want to consider introducing some organic lawn fertilizers such as Black Beauty Organic Lawn Fertilizer into your lawn care plan too.  These are wonderful soil builders and offer a slow, gentle feeding that stimulates soil microbes for better lawn growth.

Keep these ideas in mind while you enjoy a winter of football, basketball, or hockey or other hobbies.

Thursday, January 21, 2016

HOW TO PULL WEEDS BY HAND

HOW TO PULL WEEDS BY HAND

January 21, 2016

Weeding is not the most fun activity. Ideally, you should leave weed prevention and control in the hands of experts. But at some point, you may find you dedicate a great deal of time to weeding in your lawn. In order to do this well, you should make sure that you’re taking the right steps to hand weed correctly.

Tips to Pulling Weeds By Hand

Find its Base – Weeds need to be pulled at the base in order to get the root. Nearly all weeds can regrow from only a small amount of root left in the soil. Try to make sure that you've found the roots/base of the plant so that you can try to remove the weed completely.

Loosen Soil Around It – Some roots are especially stubborn. If you can loosen up the soil around the weed, you’ll be more likely to pull it out successfully.

Don’t Tug Fast – Plants can break when they’re pulled too fast. Don’t simply try to rip it out as fast as you can as the pressure may cause some of these plants to simply rip right off the root, and once they do they can be nearly impossible to remove. Try to pull slowly but assuredly, grabbing as much of the plant’s base as possible.

Wait Until Rain – You may also want to consider waiting until it rains to pull the weed out. Soil is much looser after a rain and plants can come out fairly easily. Keep in mind though that if your lawn is not healthy, you can actually damage your lawn by stepping on it when it’s wet.

Clean it Out – Once you've successfully pulled the weed out, make sure you examine what remains in order to ensure that the root has completely been removed. Sometimes it can feel like you removed the entire plant, only to find that some of the root still remains.

Turning to a Professional

As “simple” as it may be to pull out weeds on your own, the process is not only time consuming – it is often not that effective, and leaves a lot of holes in your yard that won’t simply grow back grass. Contact LandXscapes today to find out more about our weed control service, or to schedule a consultation with one of our experts.

Wednesday, January 20, 2016

Buzzing with Blooms

Prickly Pear is Buzzing with Blooms

I noticed the other day that my spineless prickly pear was just about to bust into full bloom. The combination of the baby spikes (that it loses) the flower bids and the purple tunas is pretty awesome looking.  Well, bloom it did and as I approached this morning I noticed a low humming. Hundreds and hundreds of bees were having a flower celebration jumping from flower to flower.It was quite the sight- check it out.
Diving right in-DSC_0033

DSC_0043
Multiple levels
DSC_0052

Heavy load-
DSC_0055
How many bees can you fit in a photo?
DSC_0059
Prickly pear cactus blooming times can vary by the specific variety you have, but I see a lot blooming in this wet spring we have been having.  The flowers can be red, orange or yellow according to variety as well.  But no matter what, the bees love it.   The flowers are  filled with pollen and  easy to locate. I love the spineless variety even though they are not truly “spineless” so you have to be careful of the small, almost invisible, spikes that still exist and can be a nuisance if they embed in your finger.

Tuesday, January 19, 2016

Simple Tips for Achieving the Best Lawn this Year

Simple Tips for Achieving the Best 

Lawn this Year

Why is it that sometimes even after all the hard work and money you've put into your lawn, it still doesn't look as good as you would like it to?
Here are some simple tips that will help you get the best looking lawn, on your street this year. The best part is it won’t cost you a lot of money to get it… in fact, it may help you save some of that hard-earned green.
One of the first things that you can do to help with the look of your lawn,is to water properly. Watering can have a big impact on a lawn,s appearance. We often blame a bad lawn on a lack of water, when over watering is just as much at fault. Homeowners generally irrigate their lawns every day for 20 minutes (simply because that is the way most irrigation systems are set up) without realizing that this type of light watering can lead to shallow rooting and disease. Shallow rooting creates a weaker plant that is prone to environmental stresses, which can result in an increase in lawn diseases. Also, not allowing the lawn to dry out can increase the likelihood of turf disease. This ultimately leads to discoloration of the lawn and poor visual quality.
When it comes to watering your lawn and helping it look its best, water only when the lawn needs it and be sure to water deeply. Watering deeply in the morning when the lawn requires it will give your turf the opportunity to dry out and prevent lawn diseases in the process.
Mowing is another important practice for getting the best lawn possible. A sharp mower blade allows the turfgrass to heal quickly and prevents diseases. A dull mower blade, on the other hand, frays the tips of the plant, giving the lawn a whitish appearance instead of that desirable dark green color.
Image
www.landxscapes.org
Image
*** Sharp mower blade ***
Mowing to a height of no shorter than 3 inches allows the plants to shade their own roots and soil, helping them retain moisture and reducing the need for watering. The longer the Mowing  to a height of no shorter than 3 inches allows the plants to shade their own roots and soil, helping them retain moisture and reducing the need for watering. The longer the grass, the darker the color of the turf, and this will often be the biggest difference in the look of a lawn. Many homeowners will try to make the lawn resemble a golf course and cut the grass,  to a height of no shorter than 3 inches allows the plants to shade their own roots and soil, helping them retain moisture and reducing the need for watering. The longer the grass, to a height of no shorter than 3 inches allows the plants to shade their own roots and soil, helping them retain moisture and reducing the need for watering. The longer the grass, the darker the color of the turf, and this will often be the biggest difference in the look of a lawn. Many homeowners will try to make the lawn resemble a golf course and cut the grass,way too short. Shorter lawns require more input and will encourage more weedy grasses and disease. Keeping grass,longer will really make a big difference in the health and appearance of your lawn.

Monday, January 18, 2016

How to water your new lawn

How to water your new lawn

Landscape Maintenance Tips:  Guide for cool season grasses -

A new seed bed must be kept moist in order for the grass seed to germinate.  This means watering 2-3 times daily.  IF THE SEED BED IS ALLOWED TO DRY OUT JUST ONCE YOU CAN LOSE UP TO 30% OF YOUR SEED GERMINATION.  What this means is if you are watering once a day with a garden hose it is not enough.  Water is the key element in the success or failure of your new lawn.


 Pop-up sprinkler.

  1. Water new seed bed 2-3 times a day to keep soil moist.
  2. Once grass seed has germinated DO NOT STOP WATERING.  Now the seed is a young seedling with a growing leaf area to support with a very small root system to draw water with. 
  3. Now that your grass seed has germinated and is about 2" tall you should increase the watering time to a minimum of 30 minutes 3-4 times per week.  This will cause the root system to grow down in search of water rather that up towards the surface where the moisture is after light watering.
  4. The best time of day to water your lawn is the morning.  This will provide moisture for the grass plants well into the day when they are under the most stress from the midday temperatures and drying sun.  Also evening watering creates extremely high nightime humidity and optimum conditions for many fungus diseases.

Friday, January 15, 2016

How to Kill Moles !!

I hate moles, really I do. I know there are people out there that probably do not condone killing any animal, even moles, I’m not that type of person, but if you are, I can respect that, though this blog post is not for you.
Personally I like animals fine, I try to encourage animal habitat and would never hurt an animal out of spite, however I’ve hunted in the past, and will again in the future, and when that woodpecker destroys my siding, or that ground hog destroys my garden, or a mole destroys my yard, its game on.
And really, I grew up in the woods, our mailbox was a mile from our house. We lived down a dead end dirt road, at the dead end of the dirt road, this was nature people, and do you know how many moles my parents have crawling under their yard? None. How many ground hogs tore up their plantings? None. (though, deer always did). How many woodpeckers… well until they got vinyl siding those were a problem, but my dad took care of them with a 12 gauge. The point is, I see more rodents on a daily basis living in town than I ever did living out in the forest. Why? Because there are more predators in the forest, they keep the population in check. In town, not so much, so the population gets out of control. So for those who feel that it was their land first and we’re the intruders, remember that if not for us, in fact, there would be less of them. We created the environment in which they thrive, unfortunately.
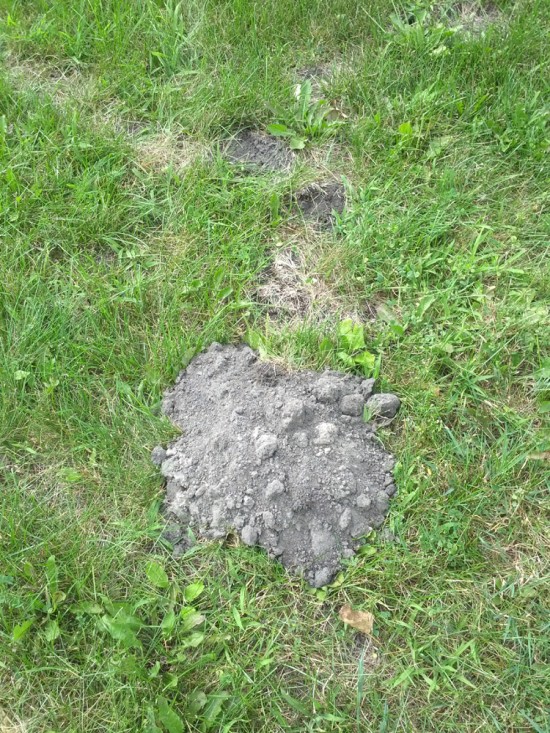
A Mole Hill
A Mole Hill
So moving on, I’m going to talk about how to kill them. I know of no known live traps for moles, sorry, while there are deterrents they do not seem to work well and will just drive them to your neighbors yard. Still, I will cover them first. Also, I’m going to talk about voles. Voles are like smaller moles (more or less mice). They will both leave tunnels in your hard, but they are different animals. Voles will leave smaller tunnels and not tend to push up big mounds of dirt, they’ll also eat plant roots and kill them potentially. Moles tend to be carnivores, eating grubs and worms, will make bigger tunnels, and push up mounds of dirt when they make a den.
Milky Spore
Milky spore actually seems to work, though I’m not entirely sure because it isn't something I’m able to scientifically check and study, but to me it seemed to work. What it is is a bacteria that kills grubs, which is a prime food source for moles. One application can last for 10 years in your yard, or more even, as the bacteria thrive and reproduce and continue to kill grubs. Second plus, fewer Japanese beetles. This might be a solution for the more squeamish as it kills grubs and not moles. The good thing about this solution is that it is easy to treat your entire yard at a reasonable price. It can be hard to find locally, I recommend purchasing it online.
Castor Oil
Castor Oil (the same stuff used to make Ricin by the way) is supposedly abhorrent in odor to moles, and can scare them to your neighbor’s yard. This to me did not seem to work, though I’ve used it, it isn’t that expensive but unlike Milky Spore it doesn’t last very long at all. You can get it in sprays to attach to the end of a hose or in granular form. You’ll probably be able to find this locally no problem.
Sound Devices
Some vendors make these sound devices you stick into your yard that create vibrations in the subsoil that supposedly will drive moles away. I’ve seen these used in my neighborhood, but I’ve never used one myself. They’re worth a try I guess if you don’t want to get more medieval, but I cannot personally recommend them having no experience.
Traps
I have tried a variety of kill traps over the years, I’ve never once had a confirmed kill. Maybe I’m doing it wrong, maybe I’m setting the traps on the wrong tunnels. They often say “find the main tunnel” but if your yard is crisscrossed who knows which run they’re using all the time. Some traps are plunger based where the mole pushes up on the trap and spring loaded spikes clamp down. Others have a scissor like action where there are jaws open you put down into the hole and when the mole comes through them, clamp shut. Another one I’ve tried was more of a noose like trap, the smallest of the lot, you put down in the tunnel and covered up (and put in a marking flag so you remember where you put it). Again, I’ve never had a confirmed kill. I know professional outfits use traps a lot, so I imagine they do work, they just don’t work for me.
Poison Baits
Here I can buy these at Home Depot, but I understand they’re not legal in all states, I’m not entirely sure why. They come in a little yellow plastic cone bottle and you use the pointy end to poke a hole in the tunnel then dump in some bait. I’ve never ever seen a dead mole from using these baits, but I really think they work for me, as I usually notice less mole activity after using them. I sort of have to take it on faith that they work since there is no little rodent body for proof, but as long as the activity stops, I’m happy, so I’m happy to recommend them. There are also these poison worm baits which supposedly work even better. I will be trying them. I’m a big believer in poison baits for killing rodents.
Drowning
If you find a mole’s burrow you can put your garden hose down it and drown it out, this might also work to drown any mole babies down there. Sometimes it can help you finding the exit elsewhere as the water bubbles up. Of course the porosity of your soil will effect how useful this is. Also some people think that all you’re doing when you do this is giving them a drink of water up there. Also, if you do this, you should have a shovel (shotgun maybe) ready, because if they flee the water you’ll want to be able to whack them.
Patience
Speaking of whacking, if you have a beer and a rocking chair and a shovel you can just mow your lawn, stomp down a few hills, and then sit out there and watch your grass grow… and maybe, just maybe you’ll see a mole in action, pushing up the soil, and you can run over, stick the shovel in, flip it up, expose the mole, and whack it. The benefit of this method is you have a dead mole, so you know it works, the problem is the time needed to do it.
Suffocating
Another popular option is to take the exhaust from your lawn mower or car, put it into a garden house (so you stick the hose up the exhaust pipe while the engine is running – and that’s very dangerous for you so don’t breath that in) then stick the other end into the mole hole. The carbon monoxide will filter down into the mole area and they’ll die of suffocation. This might also work with dry ice. The problem is that you don’t know how extensive the burrow is and the gas might be coming up out somewhere else in the yard before it gets to the moles. Definitely keep animals, children, and even adults, out of the area while you try this. If the gas ended up emanating up under someone’s lawn chair that could be dangerous. Same thing with the water method, have shovel or shotgun handy. You can also do this with a little propane canister, like what you’d use for plumbing, remember many gases are heavier than air so they’ll sink down into the tunnels.
Flame On
This one is my favorite, though I’ve never tried it. You definitely should be a professional to do this, or at least, I’m saying, do this at your own risk. What you do is pump propane down into the mole hill like the suffocating method, and then… and then… you light it on fire. Boom! You burn them up or burn them out. This seems to me like it would be a very effective method, but as I said, I’ve not tried it. I do have a nice big propane torch which is actually a good gardening tool as I’ve blogged about earlier.
Summary
Any of my “shovel” options above you can also try with a pitch fork, in which case you can just try stabbing into the ground if you see the dirt moving. I’ve also heard of things like juicy fruit gum or human hair being repellents but I think those are likely old wives tales. One good idea I heard was getting worm oil from a fishing bait shop, and then coating your traps or holes or poison peanuts with it to attract the moles to their last meal.

www.landxscapes.org

Thursday, January 14, 2016

Use Impatiens to Brighten up Shady Spots

I just did a search on my blog for impatiens, I found 0 results, I can’t believe I've never mentioned this plant in a post before.
It is my firm belief that every ornamental gardener (and even vegetable gardeners – to attract pollinators) should plant both perennials and annuals. I love perennials because you plant them once and you’re done, they do well in droughts because they have stronger roots, and over time you can even get free plants as they multiply. But in general perennials only flower for a short period of time. LandXscapes 
A nice tropical annual on the other hand can flower, and flower, and flower, from your frost free date in the Spring (assuming you bought starter plants or started your own seed indoors), until the first frost in the fall. Mixing annuals in with your perennials allows you to provide constant pops of color, constant bee food, even when nothing else might be in flower. They’re great really. I also love them in containers, since perennials in containers will eventually become root bound.
www.landxscapes.org
A large urn-style container in the shadier part of my yard bubbling with vivid impatiens.
Of course, perennials have their place too, because lets face it, gardening with only annuals would get quite expensive if you have to buy a garden’s worth of plants each and every year. Of course you’ll save a ton of money if you can start them from seed, but it does require some infrastructure, a greenhouse or a well setup, large, south facing window. One day when I get my greenhouse (next summer, yippee) I’ll probably do that, but for now, I’m out there buying flats like everyone else.
I do prefer to buy flats of the smallest, cheapest, annuals, not bigger plants all done up in premade baskets or anything, I don’t find value there.
Moving on, impatiens, I love them, they’re so neon bright it is amazing for a plant that doesn’t like the sun. They’re like little jewels glistening in the shade, really bright pops of color. Off the top of my head I cannot think of any other shade plant that flowers like that, not one. Something like a coleus can get bright foliage, but not like this. Hydrangeas and Rhododendrons do okay with some shade, and get big showy blooms, but not this vibrant.
So I’m moving this summer so I’ve greatly paired back the functional aspect of my gardening, fewer herbs, fewer vegetables, because I won’t be around to harvest them anyway. However I am increasing my annual flower planting to make sure there is always bright and beautiful flowers whenever a realtor might show the house. So I went to the big box store and bought a tray of impatiens, a mix of colors. There are more upright varieties, premium varieties, but like I said above, I like the cheap ones. Then I, with the help of my kids, planted them in some large planters in the heavily shaded part of my backyard. This was just a few weeks ago, and already they’ve filled in, and resemble large bubbling cauldrons of color.
Brilliantly bright impatiens.
Brilliantly bright impatiens. www.landxscapes.org

Generally I think each annual has a place. Petunias or marigolds love full sun, and being planted directly in the soil (I know, I know, you’ll find petunias planted in containers all the time, especially hanging baskets, but you will be watering them twice a day), so they have enough to drink. Begonias are my go to (and more or less the only thing I will consider) for small containers or hanging baskets in full sun, because they are highly drought tolerant. You basically never have to add supplemental water to a begonia basket so long as no roof is obstructing natural rainfall and you’re not in an arid climate. Impatiens are for shade, and they also do fairly well in shaded containers or baskets. I do not think they are as drought tolerant as begonias, but being in the shade there is certainly less need for water overall. They’ll also let you know when they’re thirsty by wilting, and pop back pretty quickly when quenched.
Bottom line, impatiens are a star in the shady garden, or in urns or planters on shady porches and decks (if there is a roof over them though, you must remember to water). If you’ve never planted them before, you really don’t know what you’re missing.

www.landxscapes.org

Wednesday, January 13, 2016

Lawn Care: The Ultimate Guide to Lawn Care for New Homeowners

So you’re a new homeowner, huh? Congratulations! Purchasing a home is one of the most exciting and rewarding parts of life, and we can feel your enthusiasm from here. But once the box dust has settled and your couch is placed just right, you might start to realize that you didn't just buy a house; it seems you also have to contend with the lean, mean, and (hopefully) green landscape that your house sits on.
If you’re not completely sure how to wrangle the beast, you've come to the right place. The experts at LandXscapes have put together this ultimate guide to lawn care for brand-spanking-new homeowners just like you and learn the tricks of the trade. Soon enough you’ll have a lawn that you can take as much pride in as your house, and an outdoor extension of your home that you can enjoy every day!

Mowing

First things first--it’s time to break out the lawnmower. The best place to start when getting your lawn’s life together is getting the yard cut down to size, and this will certainly become a regular chore for you. Although it might seem like a simple task, proper mowing entails a bit more than you might think. Before you start hacking away, consider the following:
Ensure that your mower blades are sharp. Dull blades won’t cut the grass--instead, they will just pull and tear the blades of grass and you will end up with a messy, not-so-polished look (unless that’s what you’re going for).
Set your mower blades to a higher setting. Although setting your mower blades lower in order to have to mow less often may seem tempting, cropping your grass too short puts a whole heap of pressure on the turf. It’s better to mow more often at a higher setting than the other way around.

Watering

Alright, you must be thinking, how hard can watering be? Does it really warrant a section on a lawn care guide? Well, unless you want your lawn to be either a soppy mess or an arid desert, listen up. Watering your lawn might seem like a nobrainer, but under and over-watering, or otherwise watering improperly, can cause serious issues down the road. To make sure your lawn maintains a happy moisture medium, follow these tips:
Water your lawn early in the morning instead of during the day. This practice, although a nuisance to your sleep schedule, will ensure that the moisture actually gets down into the soil and to the roots of your grass before the sun evaporates it away. The best time to water will be in the early morning hours, between 6 AM and 10 AM.
When you water, look for signs of improper moisture. If you see areas where water is pooling, or areas where the grass is discolored and brittle, adjust your watering accordingly. Areas with pooled water are over saturated, so you should water less in that area. Conversely, areas with discolored or brittle grass are likely not receiving enough moisture.
Water deeply and less often. In general, your lawn will need between 1 and 1.5 inches of water total per week. Water a few times per week and make sure that you are watering deeply so that the water is getting to the roots of your plants. In addition, watering deeply encourages plant roots to grow deeper into the soil, which creates a landscape that is more resilient to pests and disease.

Aeration

Have you ever seen someone walking around with a little machine that pokes holes in their lawn? That practice is called aeration, and it is one of the most important lawn care tasks that not a lot of people do. Think of aeration and thatch removal as an annual lawn rejuvenation-- a way to let your lawn breathe. Aeration is one of the easiest and most effective ways to keep your lawn healthy and happy. We recommend this lawn practice in the fall after your lawn has suffered heavy foot traffic and drought throughout the summer.
Benefits of aeration include:
  • Breaking up thatch
  • Increasing fertilizer efficiency
  • Improved irrigation and moisture
  • Stronger roots
  • A healthy and happy lawn

Fertilization

Image result for picture of lawn fertilization
Regardless of the season, every lawn could use a little TLC in the form of fertilizer. Even the healthiest lawns can use a boost now and again, and keeping a fertilization treatment on your lawn care to-do list is a sure fire way to ensure that your landscape stays happy all year long. To revitalize your lawn after stressful seasons, feed it a fertilizer rich in nutrients like nitrogen to replenish lost nutrients and give it a healthy kick start to make it into the next season.

Trees and Shrubs

Once you've mastered your grass, you can move on to trees, shrubs, and other decorative ornamentals. When it comes to trees and shrubs in your landscape, it’s all about the species. Be sure to check which plant species grow the best in your area, so you don’t wind up with an unfortunate situation--like a dead lemon tree in the middle of Minnesota.
Follow these steps to ensure tree and shrub success:
  • Pick the right plant for you. If you don’t have the time to devote to pruning or grooming your plants, be sure to buy one that requires minimal maintenance.
  • Pick an area with the right ratio of shade to sunlight for the plant. Take the time to examine your yard before you decide on placement so you know where the full, partial, and low sun areas are. Your future happy plants will thank you.
  • Make sure you water your trees and shrubs properly. They may have differing watering needs than your grass, so be sure to pay attention to how much--or how little--you are watering them.